

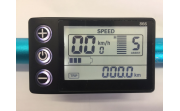
RIDE66 Middle set negative LCD display UKS2

If you want an middle set negative LCD display UKS2 to upgrade your ebikes. go to ride66.com to buy it.
RIDE66 UKS2 Middle set negative LCD display User’s Manuall Download
1. Production Name
Middle set negative LCD display, model UKS2
2. Supplier
Tianjin UKriver Science and Technology co.,ltd
3. SPEC
² 24V/36V/48V/60V/72V/UBE power supply
² Rated power 1W
² USB charge DC 5V 500mA
² Power off leak currant<1uA
² Controller supply work currant100mA, peak lower than 300mA
² Operating temperature -20~70℃
² Storage temperature -30~80℃
4. Parameter and Material
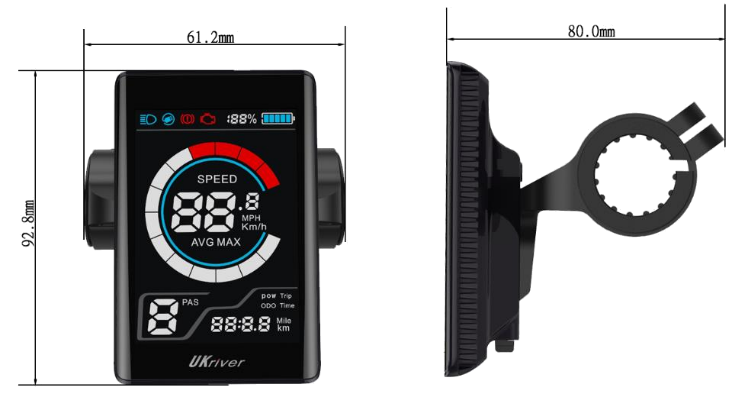
ABS housing, the material for the transparent window is imported high hardness acrylic, the bracket is made of glass fiber and nylon.
5. Production Introduction
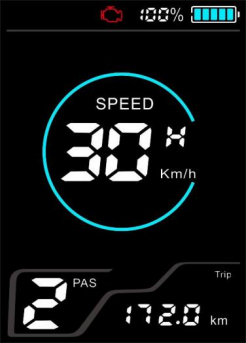
² Speed display: including real-time speed “RT SPEED”, “MAX SPEED”, average speed “AVG SPEED”
² SEETING SPEED SCALE(mph/kph): Km / mile display can be set according to customer habits
² Intelligent battery indicator: Provide stable battery reminder through optimization algorithm, power is not affected by motor start-stop fluctuations, if the system supports battery communication, it can display accurate percentage power
² 5 levels of backlight brightness: Set the brightness of the backlight according to customer usage habits. Level 1 is the darkest and Level 5 is the brightest
² At most 9 gears: Number of gears can be set according to user needs, like 3/5/9/6
² Mileage display: Can display accumulated mileage “ODO”, single mileage “Trip”, riding time “Time”
² Output power indication: Real-time display of output power (battery output power)
² Fault Reason Display: provide description for fault code
² Walk assist function: support 6km walk assist
² Speed measuring magnets number adjustment: numbers can be set according to the actual requirements of customers
² PAS magnets number adjustment: numbers can be set according to the actual requirements of customers
² Endurance mileage indication (requires battery to support communication)
² Battery information display (requires battery to support communication)
² USB charging port, can provide rated charging for mobile devices, current: 500mA / 5V
² Program upgrade: can be upgraded through serial port. For details, please refer to description documentation
² Parameter setting: parameters can be set by button, including gear, wheel diameter, voltage binning, limit speed, current limit, etc., please refer to the description of parameter setting
6. LCD Display Instructions
LCD full display
as follow:
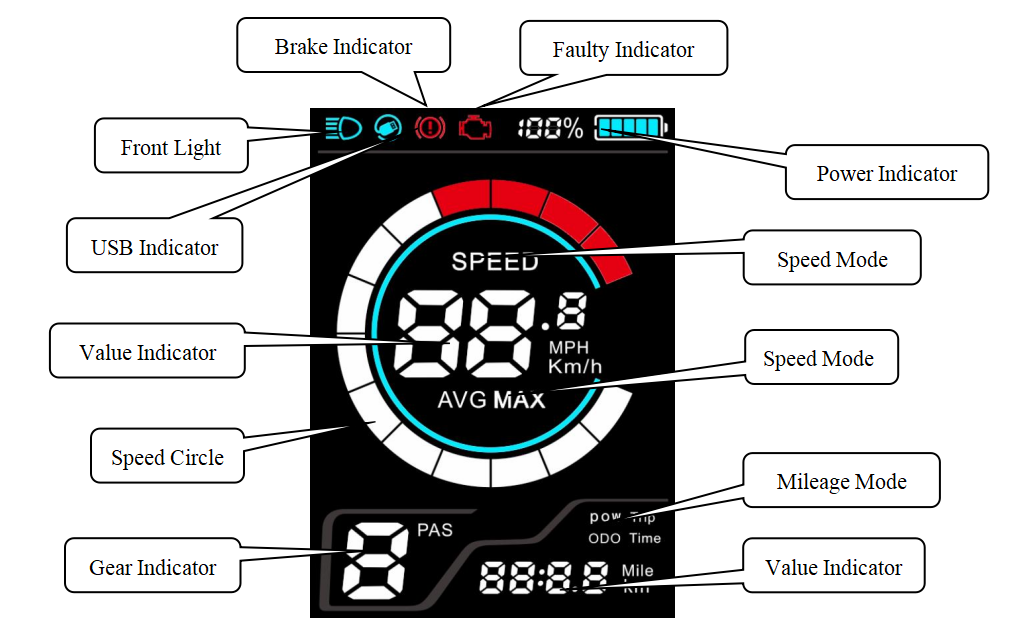
² Speed mode: average speed (AVG SPEED), maximum speed (MAX SPEED), real-time speed (RT SPEED)
² Speed display: display speed value, Km / h kilometers per hour, MPH miles per hour
² Power Indicator: Provide stable battery reminder through optimization algorithm, power is not affected by motor start-stop fluctuations, if the system supports battery communication, it can display accurate percentage power
² Headlight indication: display when the headlights are on
² Brake Indicator: display  when brake power off.
² Gear indicator: Display the current power-assisted gears 0-9, where 0 is neutral and no power, and 1-9 corresponds to power-assisted gears. Display P when in walk assist mode.
² Faulty Indicator:Display when a fault is detected.
² Mileage mode: Divided into single mileage “TRIP”, accumulated mileage “ODO”, riding time “TIME”.
² Mileage display: Display mileage information or time information according to the set mode.
² USB display: the interface displays  when the USB charging function is turned on.
7. Function Description
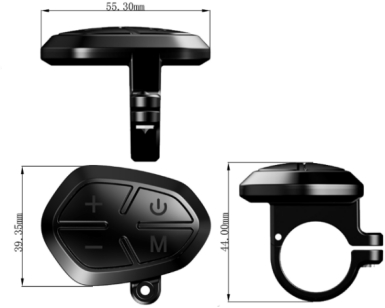
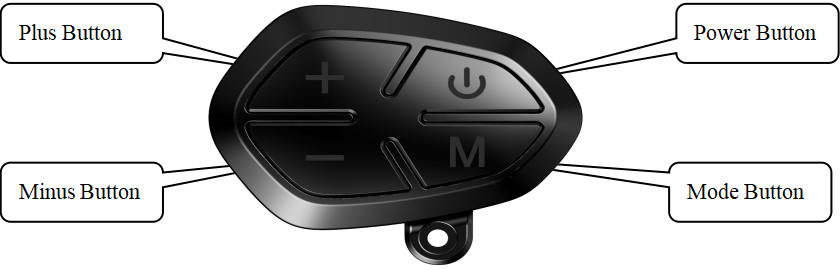 Button description as follow:
7.1 Power On/Off
Long press(1 second) Power Button when the display is off, display, the display is fully displayed and starts to work, the power of the controller is turned on; Long press(1 second) Power Button when the display is on, display power off, the power of the controller is turned off. If you ride for 5 minutes (time can be set by the user) without operating the meter, the meter will automatically turn off the power.
7.2 PAS Gear Choose
In the manual shift mode, short press Plus Button or Minus Button to switch the assist position, change the assist ratio, the lowest 1st, the highest 9th, the default is 1st when the meter is turned on, and 0 is the neutral assist.
When power on, short-press Power Button to switch the mileage display mode, and the following information is displayed cyclically: riding time (Time) → accumulated mileage (ODO) → single mileage (Trip).
7.4 Speed Mode Switch
When power on, short press theMode Button to switch the speed display mode, and the following information is displayed cyclically: real time speed (RT SPEED) → average speed (AVG SPEED) → maximum speed (MAX SPEED)
*If there is no key operation for 5 seconds, the meter will automatically return to the real-time speed display state.
7.5 Headlight / Backlight Switch
Press and hold Plus Button(1 second), the brightness of the meter's backlight decreases, and the lights are turned on (requires controller support). Press and holdPlus Button again (1 second), the display backlight will return to its original brightness, and the lights will be turned off at the same time.
*Meter backlight brightness can be adjusted in 5 levels. Users can set it according to their needs.
7.6 Walking Mode(6km walk assist)
Press and hold Minus Button (1 second), the electric bike enters the boosting state, the speed displays the real-time speed, and the gear position displays “P”. ReleaseMinus Button to exit the walking mode.
*Some controllers may not support this function
7.7 USB Function
Long press Mode Button (1 second), the USB function is turned on, the user can use the USB function, and long press Mode Buttonfor more than 1 second, the display will close the USB function, and the charging parameter is DC 5V 500mA.
7.8 Clear Data
Press Plus Buttonand Minus Button simultaneously for 1 second to clear the temporary data. The cleared data includes the maximum speed (MAX SPEED), average speed (AVG SPEED), single mileage (TRIP), and riding time (TIME).
*The above data will not be cleared when the display is turned off or the electric bike is turned off.
8. MENU Parameter Setting
When power on, press Mode Button twice (<0.3 seconds between presses), the system enters the parameter setting state. In this state, the meter parameters can be set. Press Mode Button twice again to exit the setting state. (<0.3 seconds between presses).
When in setting state, press Mode Button to select the desired adjustment item, when the parameter flashes, press Plus Buttonand Minus Button to adjust the parameter setting, pressPower Buttonto save and switch, and press Mode Button twice to exit the setting state (<0.3 seconds between presses).
*In the parameter setting state, if no key operation is performed for 30 seconds, the meter automatically exits the setting state. In the riding state (the speed indication is not 0), you cannot enter the setting interface. If you start cycling in the setting interface (the speed indicator is not 0), you will automatically exit the setting.
8.1 The display setting items are as follows:
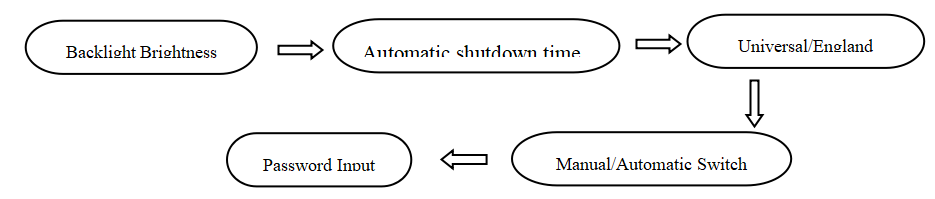
² Backlight Brightness: For item P1, pressPlus Buttonand Minus Buttonto select the display 1 ~ 5, “1” is the darkest backlight and “5” is the brightest.
² Automatic shutdown time:for item P2, press Plus Buttonand Minus Button to adjust the position, 1 ~ 9 minutes represents the automatic shutdown time, OFF means cancel the automatic shutdown function
² Universal/ England:for itemP3, press Plus Buttonand Minus Button to switch km / h or MPH display, set Universal/ England: 0 stands for universal system and 1 stands for England system.
² Manual / Automatic Switching: for P4 item, press Plus Buttonand Minus Button to select manual / automatic switching. 0 meansmanual gear, 1 means automatic gear.
² Password input: enter ADS advanced setting items, the speed position of the display shows“ADS”, indicating that entering the password can enter advanced setting items. Short press Mode Button to enter the password input state, the speed position of the display will show“PSD” at the same time, prompt for the password, press Plus Buttonand Minus Button to set the password value (0 ~ 9), press Mode Button to switch the password item, the password is 4 digits, and the default password "1801", press Mode Button to confirm the entry after the password adjustment is completed. If the password is wrong, “Err” will be displayed, and the display will automatically return to the real-time speed /single mileage display state. If the password is correct, enter the advanced settings sub-item.
8.2 The advanced setting items are as follows:
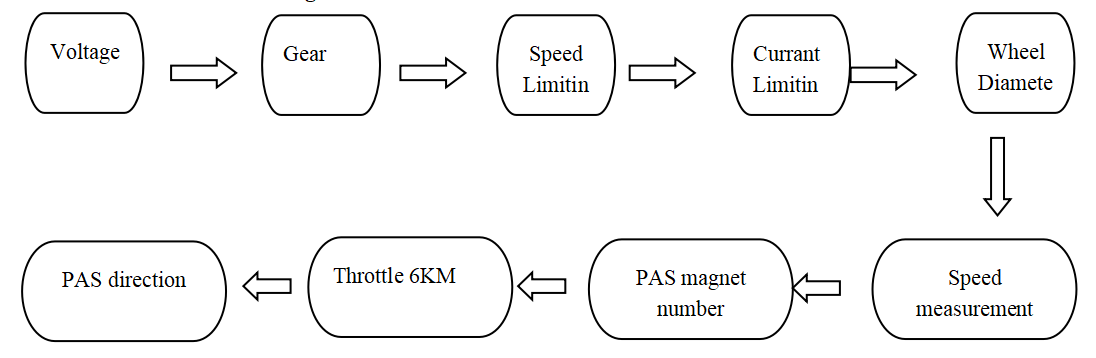
² Voltage Choices:A1item,Press Plus Buttonand Minus Button to switch between 24V / 36V / 48V / 60V / 72V / UBE. UBE stands for user-defined voltage (the voltage value can be set by a computer program. For details, please refer to the computer parameter setting instruction file).
² Assistance gear selection: item A2, Plus Buttonand Minus Button to set the gear range 3/5/9/6. 1 means 3-speed system; 2 means 5-speed system; 3 means 6-speed system; 4 means 9-speed system.
² Speed Limiting Adjustment: item A3, Press Plus Buttonand Minus Button to adjust the speed limit value. The default is 25km / h. Users can set the speed limit value according to their needs. After the adjustment is completed, press Power Button to confirm and exit.
² Currant Limiting Adjustment: item A4, Press Plus Buttonand Minus Button to adjust the current limit value. The default is 15A. Users can set the current limit value according to their needs. After the adjustment is completed, press Power Button to confirm and exit.
*Speed and current are restricted by the motor and controller at the same time and may not be able to reach the set value.
² Wheel Diameter Selection: item A5, press Plus Buttonand Minus Button to switch the display 16/18/20/22/24/26/27 / 700C / 28/29/30/31/32, select the corresponding wheel diameter, the unit is inch. Incorrect selection of wheel diameter will cause abnormal speed.
² Number of speed measuring magnets: item A6, press Plus Buttonand Minus Button to adjust the number of speed measuring magnets 1 ~ 72. The user can set the number of speed measuring magnets according to the requirements. After the adjustment is completed, press Power Button to confirm and exit.
² Number of PAS magnets: item A7, press the Plus Buttonand Minus Button to boost the number of booster magnets 3 ~ 15. The user can set the number of PAS magnets according to the needs. After the adjustment is completed, press Power Button to confirm and exit.
² Throttle 6KM: item A8项, press Plus Buttonand Minus Button to select the 6km function switch.
² PAS orientation: item A9,press Plus Buttonand Minus Button to select the direction of the power sensor.
9. Error Code Definition
UKS1 can provide error indications for vehicle faults. When a fault is detected, the LCD screen displays  , and the error code “n” and error description are displayed at the speed display position. Please refer to the error code comparison table to determine the corresponding fault.
Error Warning Interface
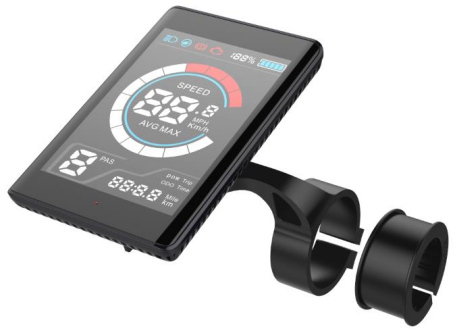
10.Installation Instruction
10.1 Please refer to the following figure for the instrument screw assembly. Pay attention to the screw tightening torque. Instrument damage caused by excessive torque is not covered by the warranty.
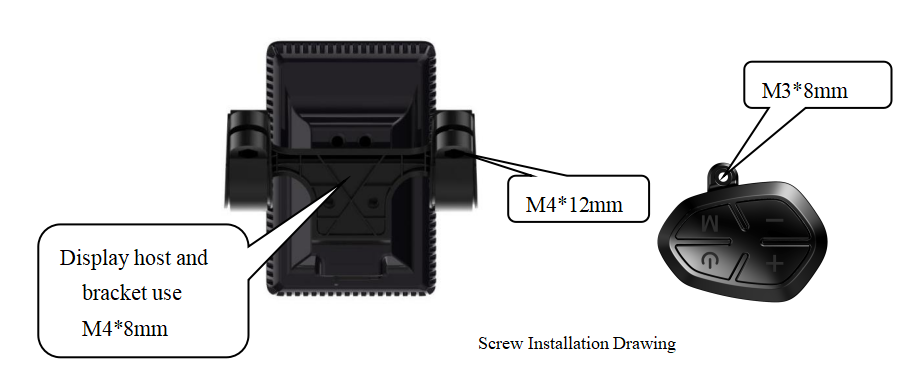
10.2 Clips are suitable for three handlebar sizes, 31.8mm, 25.4mm, and 22.2mm. Customers can choose according to actual needs.
And 25.4mm and 22.2mm need to be matched with corresponding conversion.
11.Cable Outlet Definition
The color of the five-core waterproof line is <red, blue, black, green, and yellow>. The order is defined as follows:
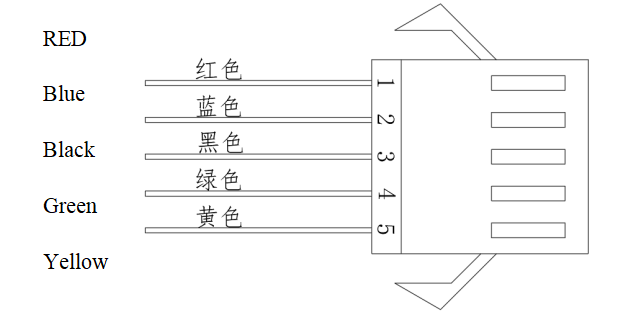
1、 RED:Power+ (Battery power 24V/36V/48V)
2、 Blue:Controller lock cable
3、 Black:GND
4、 Green:RXD display input signal, display receives signal from controller
5、 Yellow:TXD displayoutput signal, displaysends signal to controller