

RIDE66 Manual Control Panel LCD-S866

If you want an Control Panel Instructions S866 to upgrade your ebikes. go to ride66.com to buy it.
RIDE66 S866 Control Panel Instructions User’s Manuall Download
一、 Appearance size and material
The shell of the product is ABS, and the transparent liquid crystal window is imported high-hardness acrylic, and the hardness value is equivalent to tempered glass .
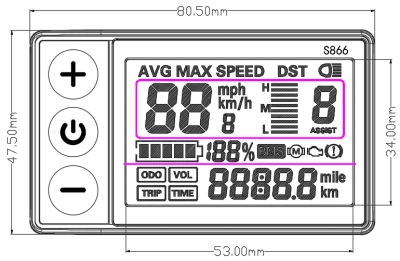
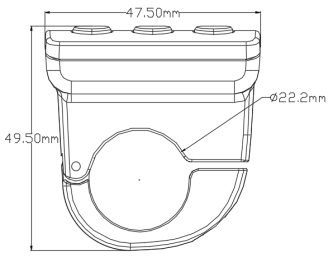
Instrument front view Instrument side view
二、 Working voltage and wiring method
1、 Working voltage: DC24V, 36V, 48V, 60V compatible,
Other voltages can be customized.
2、 Wiring:
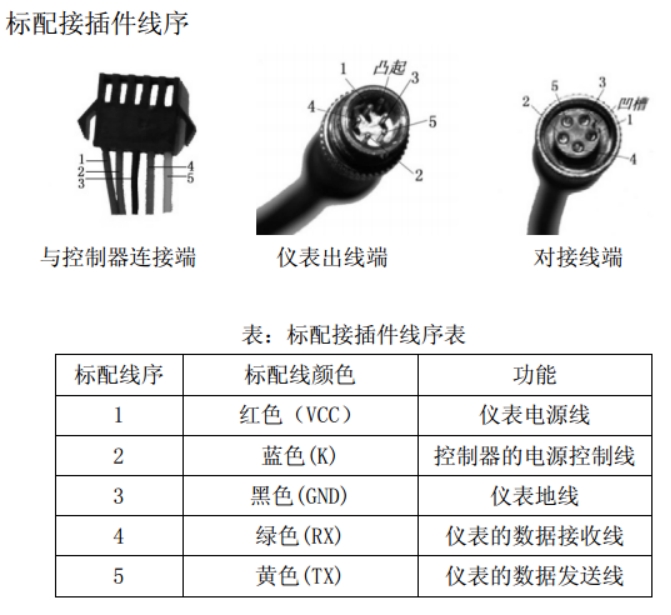
Note: The leads of some products use waterproof connectors, and the user cannot see the inside of the wire harness lead color.
3. Function description:
Function:
1. Display function
Speed display, battery indicator, fault prompt, total mileage, single mileage
2. Control, set function
Power switch control, wheel diameter setting, idle automatic sleep time setting, backlight brightness setting,
Start mode setting, drive mode setting, voltage level setting, controller current limiting value setting,
3. Communication protocol: UART
All contents of the display screen (full display within 1S after booting)
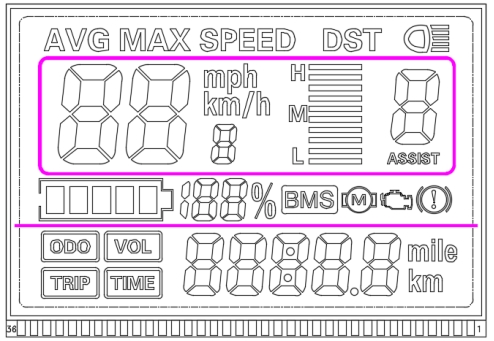
Display content introduction
3.1 Display of battery power and remaining power of BMS![]()
3.2 Multi-function display area
![]()
Total mileage ODO, single mileage TRIP (unit: mile, km), single boot time TIME, battery voltage VOL, DST: cruising range
3.3 Speed display area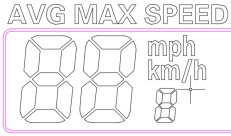
AVG: average speed, MAX: maximum speed, SPEED: current speed; unit Mp/h, km/h
The speed signal is taken from the Hall signal in the motor and sent to the meter by the controller. (Time of a single Hall cycle, unit: 1MS) The meter will calculate the number of magnets according to the wheel diameter and signal data (the number of magnets needs to be set for the motor Hall). out the real speed.
3.4 Vehicle power-assisted gear adjustment 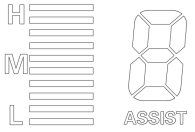 , 0-9 gear digital display and gear bar display;
3.5 Vehicle status display area

![]() : Motor failure;
: Motor failure; ![]() : Failure;
: Failure; ![]() : Brake prompt;
: Brake prompt; ![]() : Headlight on prompt;
: Headlight on prompt;
4. Settings
P01: Backlight brightness, level 1 is the darkest, level 3 is the brightest;
P02: mileage unit, 0: KM; 1: MILE;
P03: Voltage level: 24V, 36V, 48V, 60V, 64V Default 36V;
P04: Sleep time: 0, no sleep; other numbers are sleep time, range: 1-60; unit is minute;
P05: Assist gear: 0, 3rd gear mode:
1, 5 gear modes:
P06: Wheel diameter: unit, inch; precision: 0.1;
This parameter is related to the display speed of the instrument and needs to be entered correctly;
P07: Number of speed measuring magnets: range: 1-100;
This parameter is related to the display speed of the instrument and needs to be entered correctly;
If it is an ordinary hub motor, directly input the number of magnets;
If it is a high-speed motor, you also need to calculate the reduction ratio, input data = number of magnets × reduction ratio;
For example: the number of magnets in the motor is 20, the reduction ratio is 4.3: the input data is: 86=20×4.3
P08: Speed limit: range 0-100km/h, 100 means no speed limit,
The input data here represents the maximum running speed of the vehicle: for example, input 25, it means that the maximum running speed of the vehicle will not exceed 25km/h; the driving speed is maintained at the set value,
Error: ± 1km/h; (both power assist and handlebar speed limit)
Note: The value here is based on kilometers. When the unit setting is converted from kilometers to miles, the speed value on the display interface will be automatically converted to the correct mile value, but the speed limit value data set in this menu under the mile interface No conversion, it is inconsistent with the actual displayed mile speed limit value;
Note: P09-P15 menu is only valid in communication state
P09: Zero start, non-zero start setting, 0: zero start; 1: non-zero start;
P10: Drive mode setting 0: Power-assisted drive ( the amount of power to be output is determined by the power-assisted gear, and the handlebar is invalid at this time ) .
1: Electric drive ( drive through the handlebar , at this time the booster gear is invalid ) .
2 : Power-assisted drive and electric drive coexist at the same time
P11: Boost sensitivity setting range: 1-24;
P12: The setting range of the power-assisted start strength: 0-5;
P13: Three types of power-assisted magnetic steel discs: 5, 8, and 12 magnets
P14: controller current limit value setting default 12A range: 1-20A
P15: Controller undervoltage value
P16: ODO reset setting Long press the up button for 5 seconds to reset ODO
Fourth, the button introduction:
![]()
1. In the off state, press and hold the long key to turn on the power; after turning on the power, press the ![]()
![]() power on key, and the interface switches between ODO, TRIP, VOL, TIME.
power on key, and the interface switches between ODO, TRIP, VOL, TIME.
2. In the power-on state, long press to turn off, short ![]()
![]() press, power-assist gear +1, short key , power-assist gear -1;
press, power-assist gear +1, short key , power-assist gear -1;![]()
3. Long key + ![]()
![]() key to enter the mode setting
key to enter the mode setting
Parameter value modification: in a certain parameter state, short key to switch parameters, short ![]()
![]() key to increase the value, short key to decrease the value, after modification, short
key to increase the value, short key to decrease the value, after modification, short ![]()
![]() key to switch to the next parameter, and save the previous parameter value; After the parameter modification is completed , press and hold the +
key to switch to the next parameter, and save the previous parameter value; After the parameter modification is completed , press and hold the + ![]()
![]() key again to exit the setting interface. If you do not press it, wait for 8 seconds to automatically exit and save the parameters.
key again to exit the setting interface. If you do not press it, wait for 8 seconds to automatically exit and save the parameters.
Note: Due to the upgrade of the company's products, the displayed content of the product you get may be different from the manual, but it will not affect your normal use.